

Photograph of trams in Manchester, showing camera settings
At the camera club I’ve joined recently, a couple of speakers have displayed photographs with the camera settings superimposed over the image. I wondered how they’d done this, but didn’t think to ask. A search of the internet didn’t reveal any easy way to do this in an automated fashion, so I decided to figure it out for myself.
I knew that I could use exiftool1 to view the metadata on my images, and ImageMagick2 to resize and add elements to them. The question was how to combine the two and have a result that looked good.
For the rest of the article I will be using this image of a proud scooter owner.
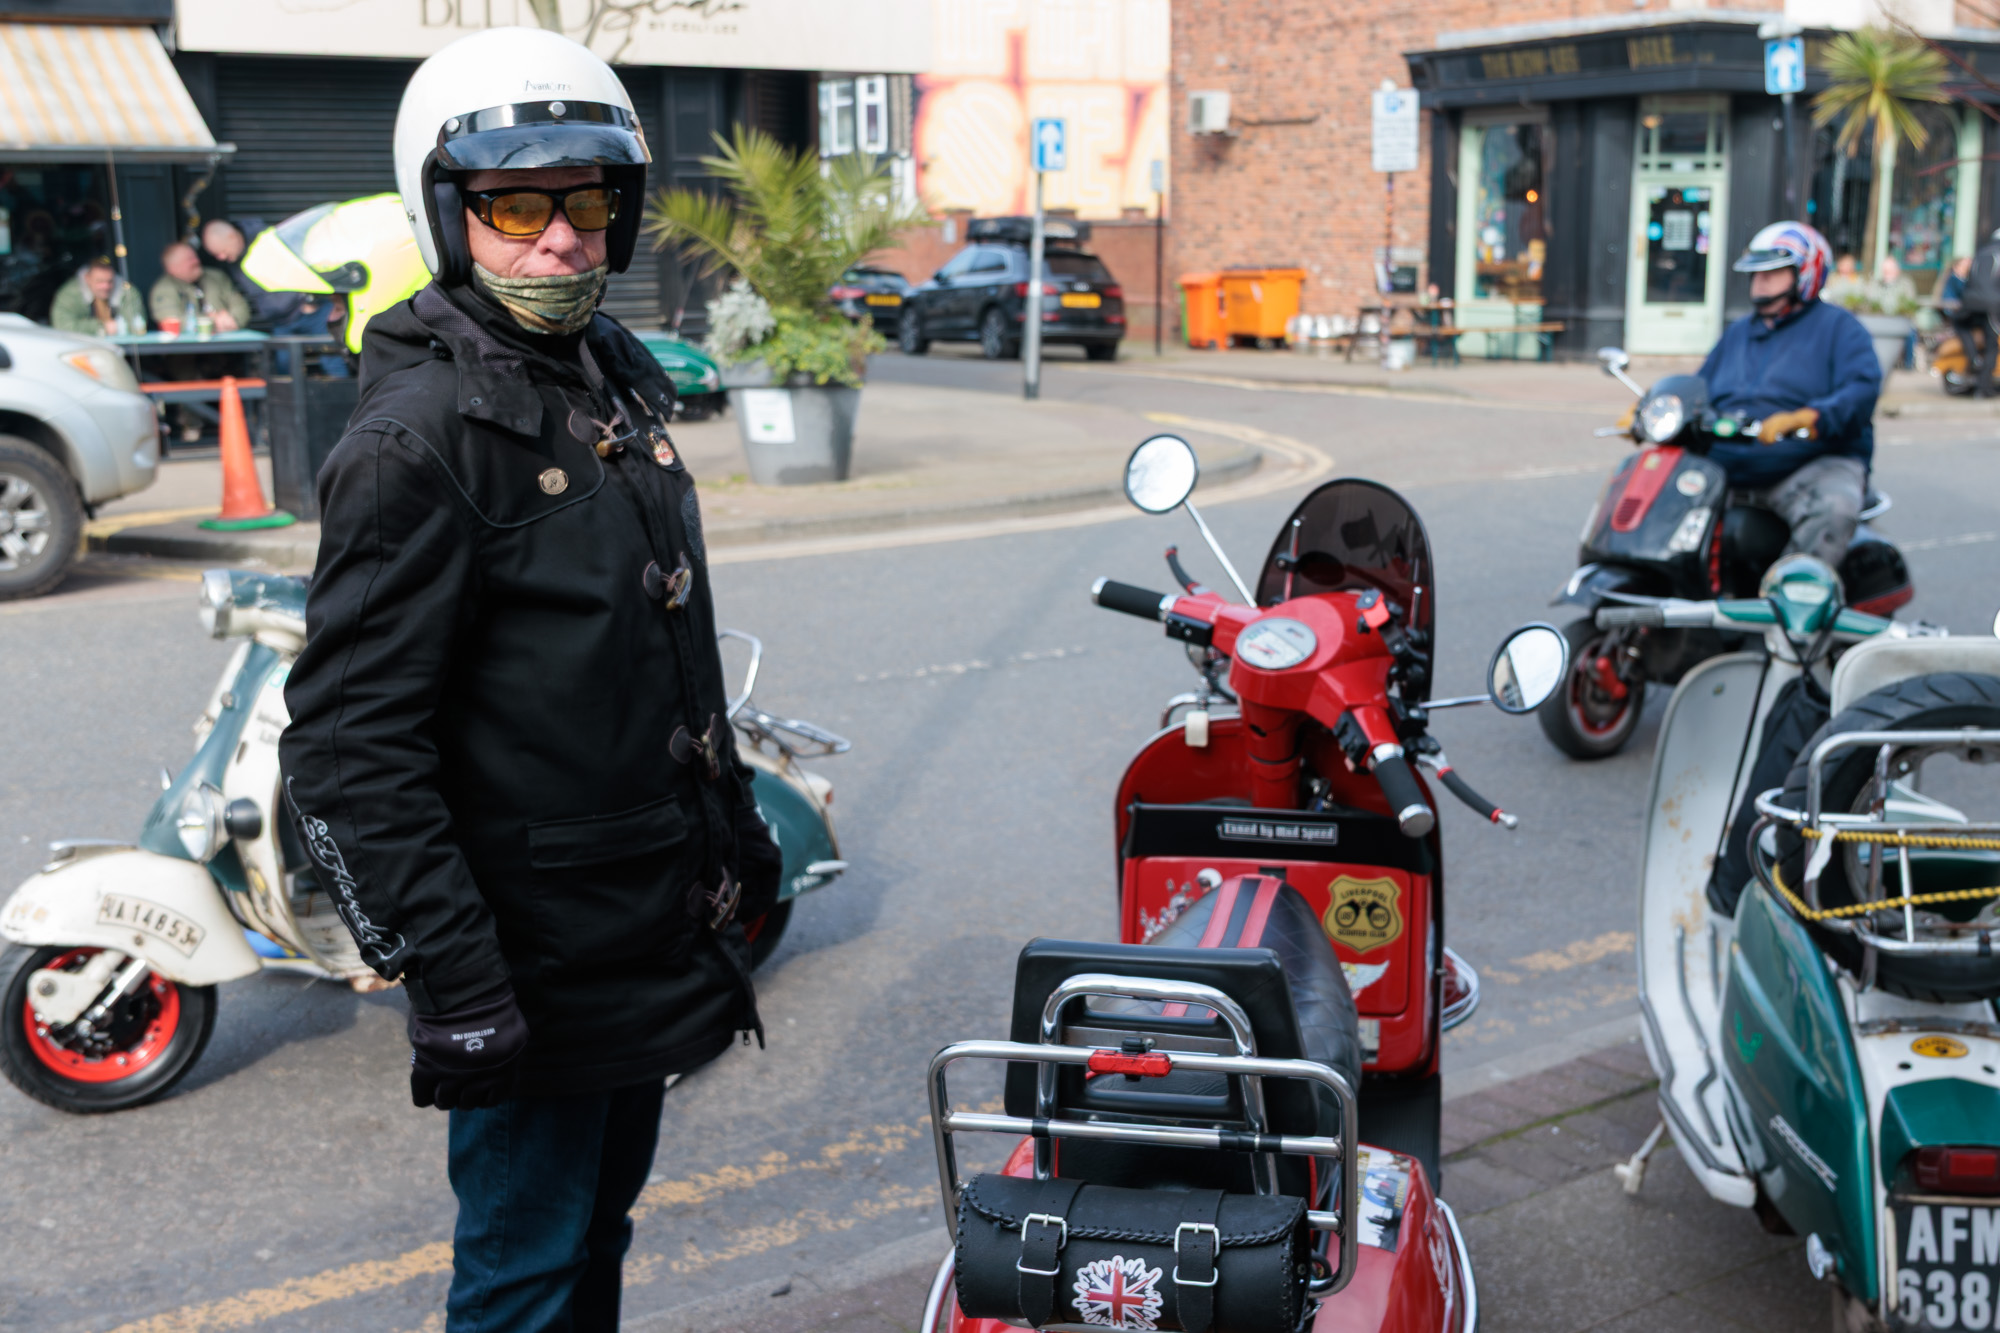
A proud scooter owner
Finding the right data using exiftool
The command to run exiftool on the command line is exiftool.
To get the full EXIF data from an image, run the command exiftool <filename>. For this image, the following data is returned:
ExifTool Version Number         : 13.36
File Name                       : 2026-04-04-scooter-owner.jpg
Directory                       : .
File Size                       : 633 kB
File Modification Date/Time     : 2026:03:23 20:41:53+00:00
File Access Date/Time           : 2026:04:04 17:59:35+01:00
File Inode Change Date/Time     : 2026:04:04 17:59:34+01:00
File Permissions                : -rw-r--r--
File Type                       : JPEG
File Type Extension             : jpg
MIME Type                       : image/jpeg
Exif Byte Order                 : Little-endian (Intel, II)
Make                            : Canon
Camera Model Name               : Canon EOS 850D
X Resolution                    : 240
Y Resolution                    : 240
Resolution Unit                 : inches
Software                        : Adobe Photoshop Lightroom Classic 15.2.1 (Macintosh)
Modify Date                     : 2026:03:23 20:41:53
Copyright                       : Tim O'Ryan
Exposure Time                   : 1/250
F Number                        : 4.0
Exposure Program                : Aperture-priority AE
ISO                             : 100
Sensitivity Type                : Recommended Exposure Index
Recommended Exposure Index      : 100
Exif Version                    : 0231
Date/Time Original              : 2026:03:22 13:44:57
Create Date                     : 2026:03:22 13:44:57
Offset Time                     : +00:00
Offset Time Original            : +00:00
Offset Time Digitized           : +00:00
Shutter Speed Value             : 1/250
Aperture Value                  : 4.0
Exposure Compensation           : 0
Max Aperture Value              : 4.0
Metering Mode                   : Multi-segment
Flash                           : No Flash
Focal Length                    : 24.0 mm
Sub Sec Time Original           : 93
Sub Sec Time Digitized          : 93
Color Space                     : sRGB
Focal Plane X Resolution        : 2688.726593
Focal Plane Y Resolution        : 2688.726593
Focal Plane Resolution Unit     : cm
Custom Rendered                 : Normal
Exposure Mode                   : Auto
White Balance                   : Auto
Scene Capture Type              : Standard
Lens Info                       : 24-70mm f/?
Lens Model                      : EF24-70mm f/4L IS USM
Lens Serial Number              : 8424000290
Compression                     : JPEG (old-style)
Thumbnail Offset                : 970
Thumbnail Length                : 19917
Displayed Units X               : inches
Displayed Units Y               : inches
Current IPTC Digest             : c0b6a936036c4068499ded398d854858
Coded Character Set             : UTF8
Application Record Version      : 4
Time Created                    : 13:44:57
Digital Creation Date           : 2026:03:22
Digital Creation Time           : 13:44:57+00:00
Copyright Notice                : Tim O'Ryan
Copyright Flag                  : True
Creator Tool                    : Adobe Photoshop Lightroom Classic 15.2.1 (Macintosh)
Metadata Date                   : 2026:03:23 20:41:53Z
Lens                            : EF24-70mm f/4L IS USM
Image Number                    : 0
Approximate Focus Distance      : 1.82
Flash Compensation              : 0
Firmware                        : 1.0.0
Date Created                    : 2026:03:22 13:44:57.930
Document ID                     : xmp.did:a164ddb0-b486-451f-b7f3-b6df01014af2
Preserved File Name             : _MG_6024.CR3
Original Document ID            : 55813A5F105906EBD5D9B11E8C36D27E
Instance ID                     : xmp.iid:a164ddb0-b486-451f-b7f3-b6df01014af2
Format                          : image/jpeg
Raw File Name                   : _MG_6024.CR3
Version                         : 18.2.2
Compatible Version              : 285212672
Process Version                 : 15.4
Auto Lateral CA                 : 1
Lens Profile Enable             : 1
Lens Manual Distortion Amount   : 0
Tone Curve Name 2012            : Linear
Camera Profile                  : Camera Faithful
Camera Profile Digest           : BD36C3F0247FAC03E6C2AA9CE32FC464
Lens Profile Setup              : LensDefaults
Lens Profile Name               : Adobe (Canon EF 24-70mm f/4 L IS USM)
Lens Profile Filename           : Canon EOS-1Ds Mark III (Canon EF 24-70mm f4L IS USM) - RAW.lcp
Lens Profile Digest             : ABA7404FAA184A74B905644028569C94
Lens Profile Is Embedded        : False
Lens Profile Distortion Scale   : 100
Lens Profile Vignetting Scale   : 100
Has Crop                        : True
Already Applied                 : True
History Action                  : derived, saved
History Parameters              : converted from image/x-canon-cr3 to image/jpeg, saved to new location
History Instance ID             : xmp.iid:a164ddb0-b486-451f-b7f3-b6df01014af2
History When                    : 2026:03:23 20:41:53Z
History Software Agent          : Adobe Photoshop Lightroom Classic 15.2.1 (Macintosh)
History Changed                 : /
Derived From Document ID        : 55813A5F105906EBD5D9B11E8C36D27E
Derived From Original Document ID: 55813A5F105906EBD5D9B11E8C36D27E
Rights                          : Tim O'Ryan
DCT Encode Version              : 100
APP14 Flags 0                   : [14], Encoded with Blend=1 downsampling
APP14 Flags 1                   : (none)
Color Transform                 : YCbCr
Image Width                     : 2000
Image Height                    : 1333
Encoding Process                : Baseline DCT, Huffman coding
Bits Per Sample                 : 8
Color Components                : 3
Y Cb Cr Sub Sampling            : YCbCr4:4:4 (1 1)
Aperture                        : 4.0
Image Size                      : 2000x1333
Megapixels                      : 2.7
Scale Factor To 35 mm Equivalent: 4.8
Shutter Speed                   : 1/250
Create Date                     : 2026:03:22 13:44:57.93+00:00
Date/Time Original              : 2026:03:22 13:44:57.93+00:00
Modify Date                     : 2026:03:23 20:41:53+00:00
Thumbnail Image                 : (Binary data 19917 bytes, use -b option to extract)
Date/Time Created               : 2026:03:22 13:44:57
Digital Creation Date/Time      : 2026:03:22 13:44:57+00:00
Circle Of Confusion             : 0.006 mm
Depth Of Field                  : 0.28 m (1.69 - 1.97 m)
Field Of View                   : 17.6 deg
Focal Length                    : 24.0 mm (35 mm equivalent: 116.2 mm)
Hyperfocal Distance             : 23.20 m
Light Value                     : 12.0
Lens ID                         : Canon EF 24-70mm f/4L IS USM
Editing software can also add more data – Lightroom Classic also adds a lot of data about your edits. I have removed some information to prevent the list being unreasonably long.
For the purposes of this article, we are interested in the following information:
- Filename
- Date and time
- Focal length (note that this appears in the list twice – more on this in a bit)
- Aperture
- Shutter speed
- ISO
- Lens model information
If we want to get a particular value, the command looks like this: exiftool -ValueToGet filename
This is a bit confusing, because the labels in our list above contain spaces and other non-alphanumeric characters. To convert these to an option that exiftool can understand, just remove these characters. So, the command to extract Exposure Time from our image will be:
exiftool -ExposureTime 2026-04-04-scooter-owner
and to extract Date/Time Original it will be:
exiftool -DateTimeOriginal 2026-04-04-scooter-owner.jpg
We can also get multiple values at once:
exiftool -ModifyDate -Copyright 2026-04-04-scooter-owner.jpg
Formatting the exiftool output
One of the most useful features of exiftool is the ability to format the output to include our own text along with the data from exiftool. We interpolate the returned data into our own text string.
For our final image, we want the camera settings to look like this when superimposed onto the photograph:
File: 2026-04-04-scooter-owner.jpg – 2026:03:22 13:44:57
24.0 mm, 1/250 sec at ƒ/4.0, ISO 100
EF24-70mm f/4L IS USM
We can use exiftool -p for this. The -p option means print, and the options provided will determine how the data is printed.
The format string can be passed in one of two ways: directly as a string in the first argument to -p, or as a text file. Because we want the text to span multiple lines, using a text file is easier.
To extract the information and format it, run exiftool -p format-file image-file where format-file is our text file and image-file is the image we are reading the exif data from. For the rest of this article, I will be using a file called exif_fmt.txt, but it can have any name.
Our text file looks like this:3
# Example exiftool formatting file
File: $FileName – $DateTimeOriginal
$FocalLength, $ShutterSpeed sec at ƒ/$Aperture, ISO $ISO
$LensModel
In common with most files, a # symbol denotes a comment.
In this file, we prefix our EXIF tags with a $ symbol, and this instructs exiftool to replace this text with the value from the EXIF data.
In our example, we run:4
exiftool -p exif_fmt.txt 2026-04-04-scooter-owner.jpg
exiftool -p has many more options than I can cover here, including conditional statements and options for running on multiple image files. I’ve copied the relevant manual page for anyone who is interested.
Using ImageMagick
Full disclosure: The next part is almost certainly not the best way to accomplish this task. ImageMagick is an enormous package with lots of options and I don’t know even 2% of it. But in the absence of anyone else having written a guide for this, this is what you’re getting. For example, a lot of numbers are hard-coded here. They work for my purposes. Feel free to change them.
The first thing I’m going to do is resize the image. We’re not printing these but we might be displaying them on a screen. I’m going to make the image 2000px wide – good enough to display on most screens and we can always reduce its size later.
To resize the image to 2000px on the longest edge, run:
magick input_file.jpg -resize x2000 output_file.jpg
By providing only one size value (x2000), we tell ImageMagick to resize the longest edge, retaining the same aspect ratio and all other settings.
The rest of this guide assumes we are working on a 2000px wide image.
Creating a semitransparent box with a border, and adding text to it
In this part, we are going to create a box big enough to hold our three lines of text, and put some text in it.
magick 2026-04-04-scooter-owner.jpg -auto-orient xc: -fill 'rgba(0,0,0,0.7)' -stroke white -strokewidth 4 \
   -draw "rectangle 0,%[fx:h-200] %[fx:w],%[fx:h]" \
   -gravity South -pointsize 50 -strokewidth 0 -fill white  \
   -annotate +0+15 "Insert text here" \
   -composite out.jpg
This command does a number of things:
- Uses
2026-04-04-scooter-owner.jpgas the input file - The
-auto-orientoption ensures that the image is oriented correctly in portrait or landscape orientation. This is necessary to ensure that the caption appears at the bottom of portrait images and not down the left hand side. - Draws a rectangle with a black background at 70% opacity (
-fill 'rgba(0,0,0,0.7)') and a white border that is 4 pixels wide (-stroke white -strokewidth 4) - The rectangle is positioned at the bottom of the image, spans the full width of the image, and is 200 pixels tall (
-draw "rectangle 0,%[fx:h-200] %[fx:w],%[fx:h]") - At the bottom of the image, in the centre (corresponding to South on a compass), start drawing some text (
-gravity South) - The text will be white, 50pt size, with no outline (
-pointsize 50 -strokewidth 0 -fill white) - The text is inset 15 pixels from the bottom of the image and 0 pixels from the left, and reads “Insert text here” (without quotes) (
-annotate +0+15 "Insert text here") - Save our composited image to a new file called
out.jpg(-composite out.jpg)
Adding our EXIF data to the image
We’re now going to combine our exiftool and ImageMagick commands into a single command, using variables to store intermediate data.
Since the input file for both commands is the same (our photograph), we can set this as a variable called infile:
infile=2026-04-04-scooter-owner.jpg ; \
Next we need to get our EXIF data from exiftool. As we will be passing this to magick in the next step, we also need to store this in a variable. We will call this settings:
settings=`exiftool -p exif_fmt.txt $infile` ; \
The backticks (``) around the exiftool command mean that we are storing the output of the command in our variable.
Finally, we run our ImageMagick command to add the text to the image:
magick $infile -auto-orient xc: -fill 'rgba(0,0,0,0.5)' -stroke white -strokewidth 4 \
   -draw "rectangle 0,%[fx:h-200] %[fx:w],%[fx:h]" \
   -gravity South -pointsize 50 -strokewidth 0 -fill white -annotate +0+15 $settings  \
   -composite out.jpg
Putting it all together, our command looks like this:
infile=./2026-04-04-scooter-owner.jpg ; \
settings=`exiftool -p exif_fmt.txt $infile`; \
magick $infile -auto-orient xc: -fill 'rgba(0,0,0,0.5)' -stroke white -strokewidth 4 \
   -draw "rectangle 0,%[fx:h-200] %[fx:w],%[fx:h]" \
   -gravity South -pointsize 50 -strokewidth 0 -fill white -annotate +0+15 $settings  \
   -composite out.jpg
For anyone unfamiliar with running commands on the terminal, the ; character means ‘move on to the next command’, and the \ character means ‘continue the current command on a new line’. The entire command could be a single line, but splitting the lines with \ makes it more readable.
Our final image looks like this:
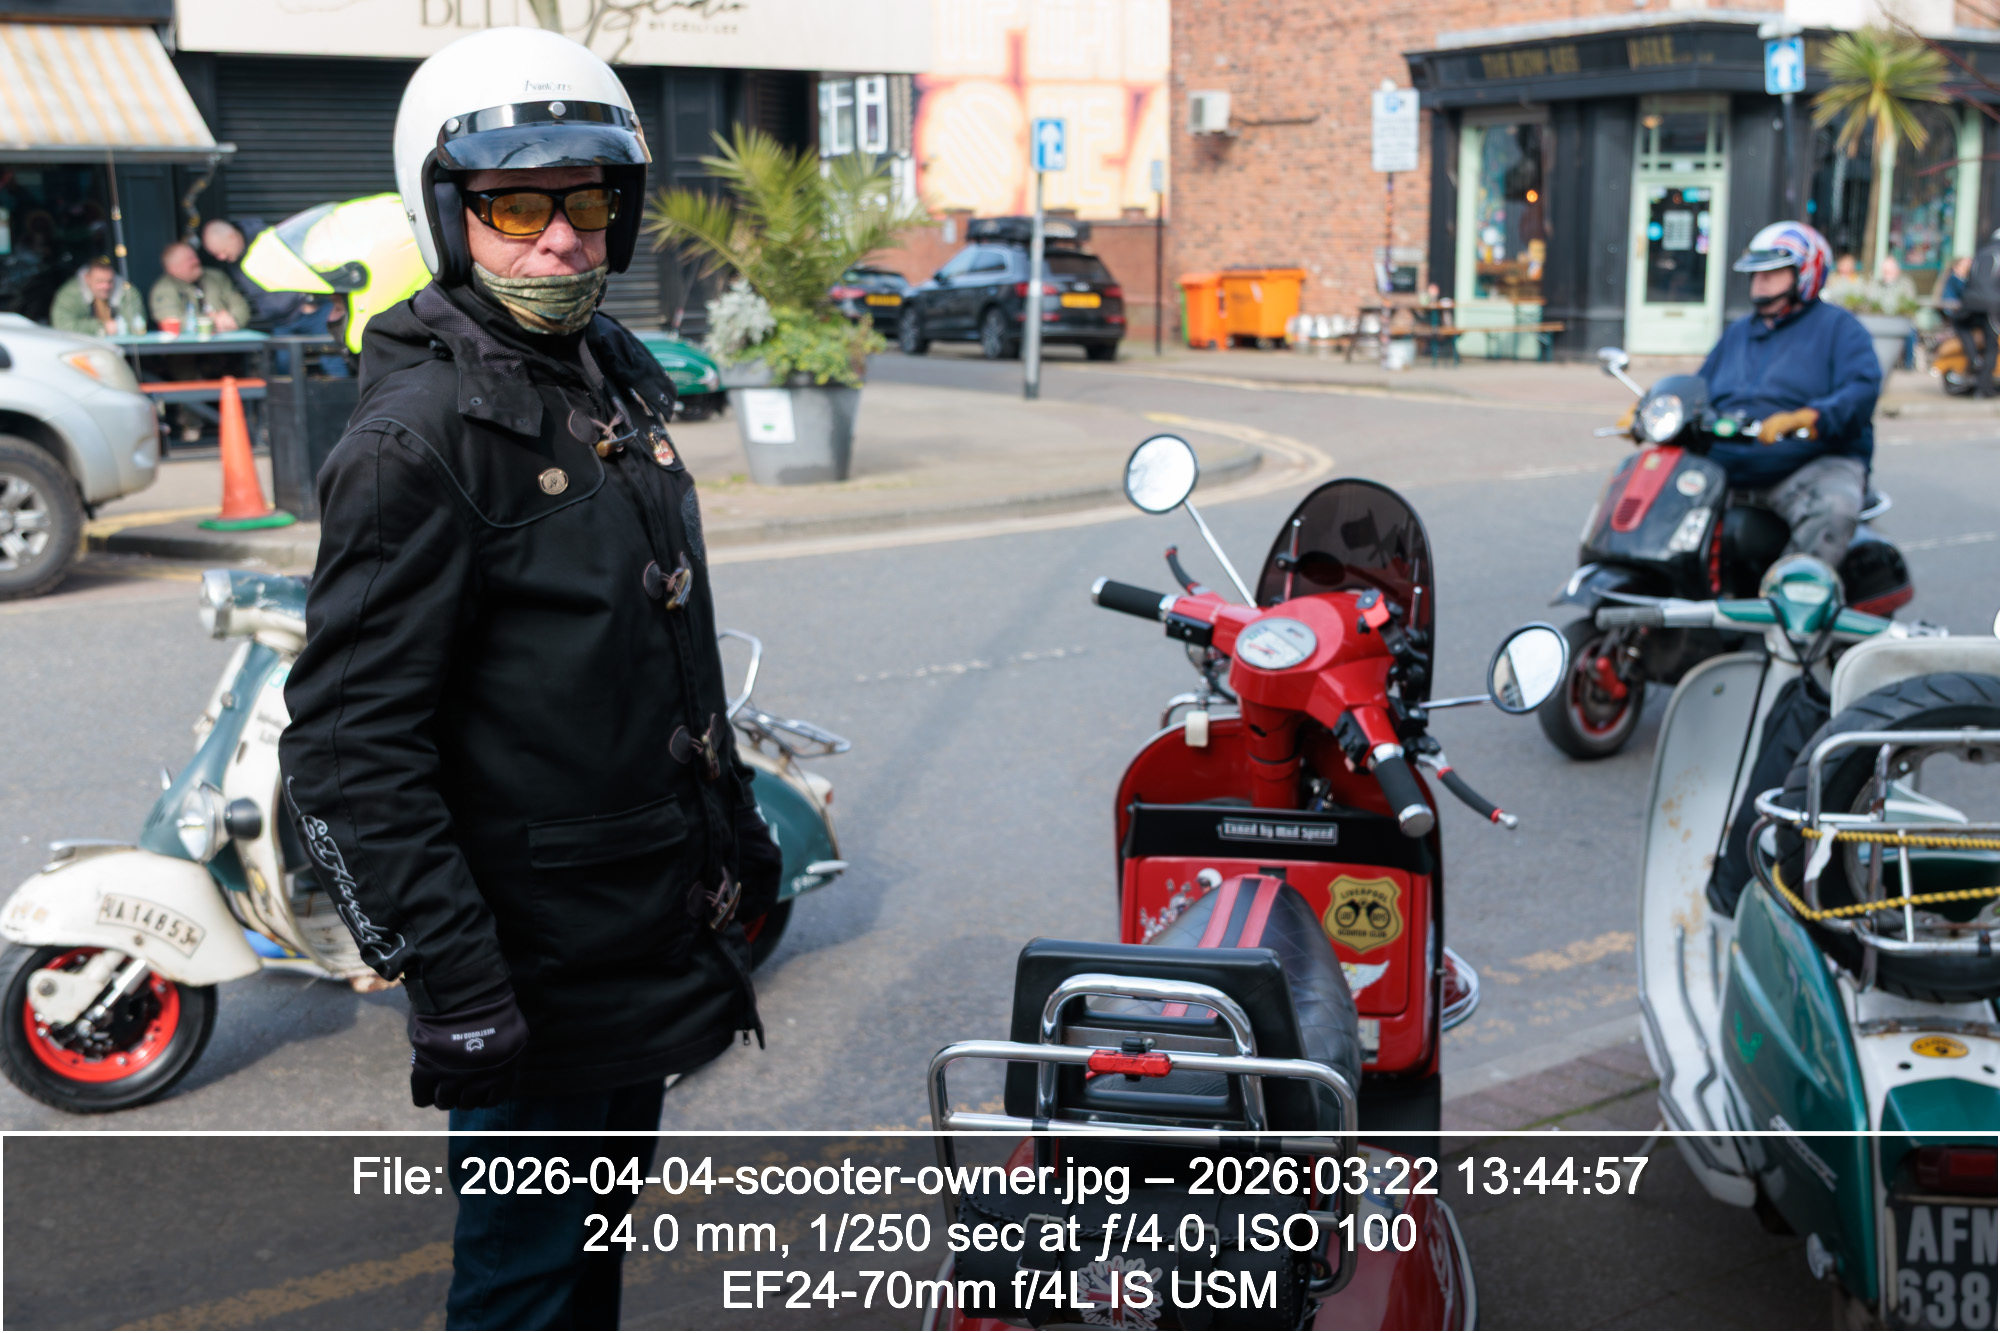
A proud scooter owner, with the image now showing the metadata
With portrait images, you may find that the text is too wide for the image, particularly if the filename is long. You can easily play about with settings to get the balance right. This image has a text size of 40 and offset of 30:
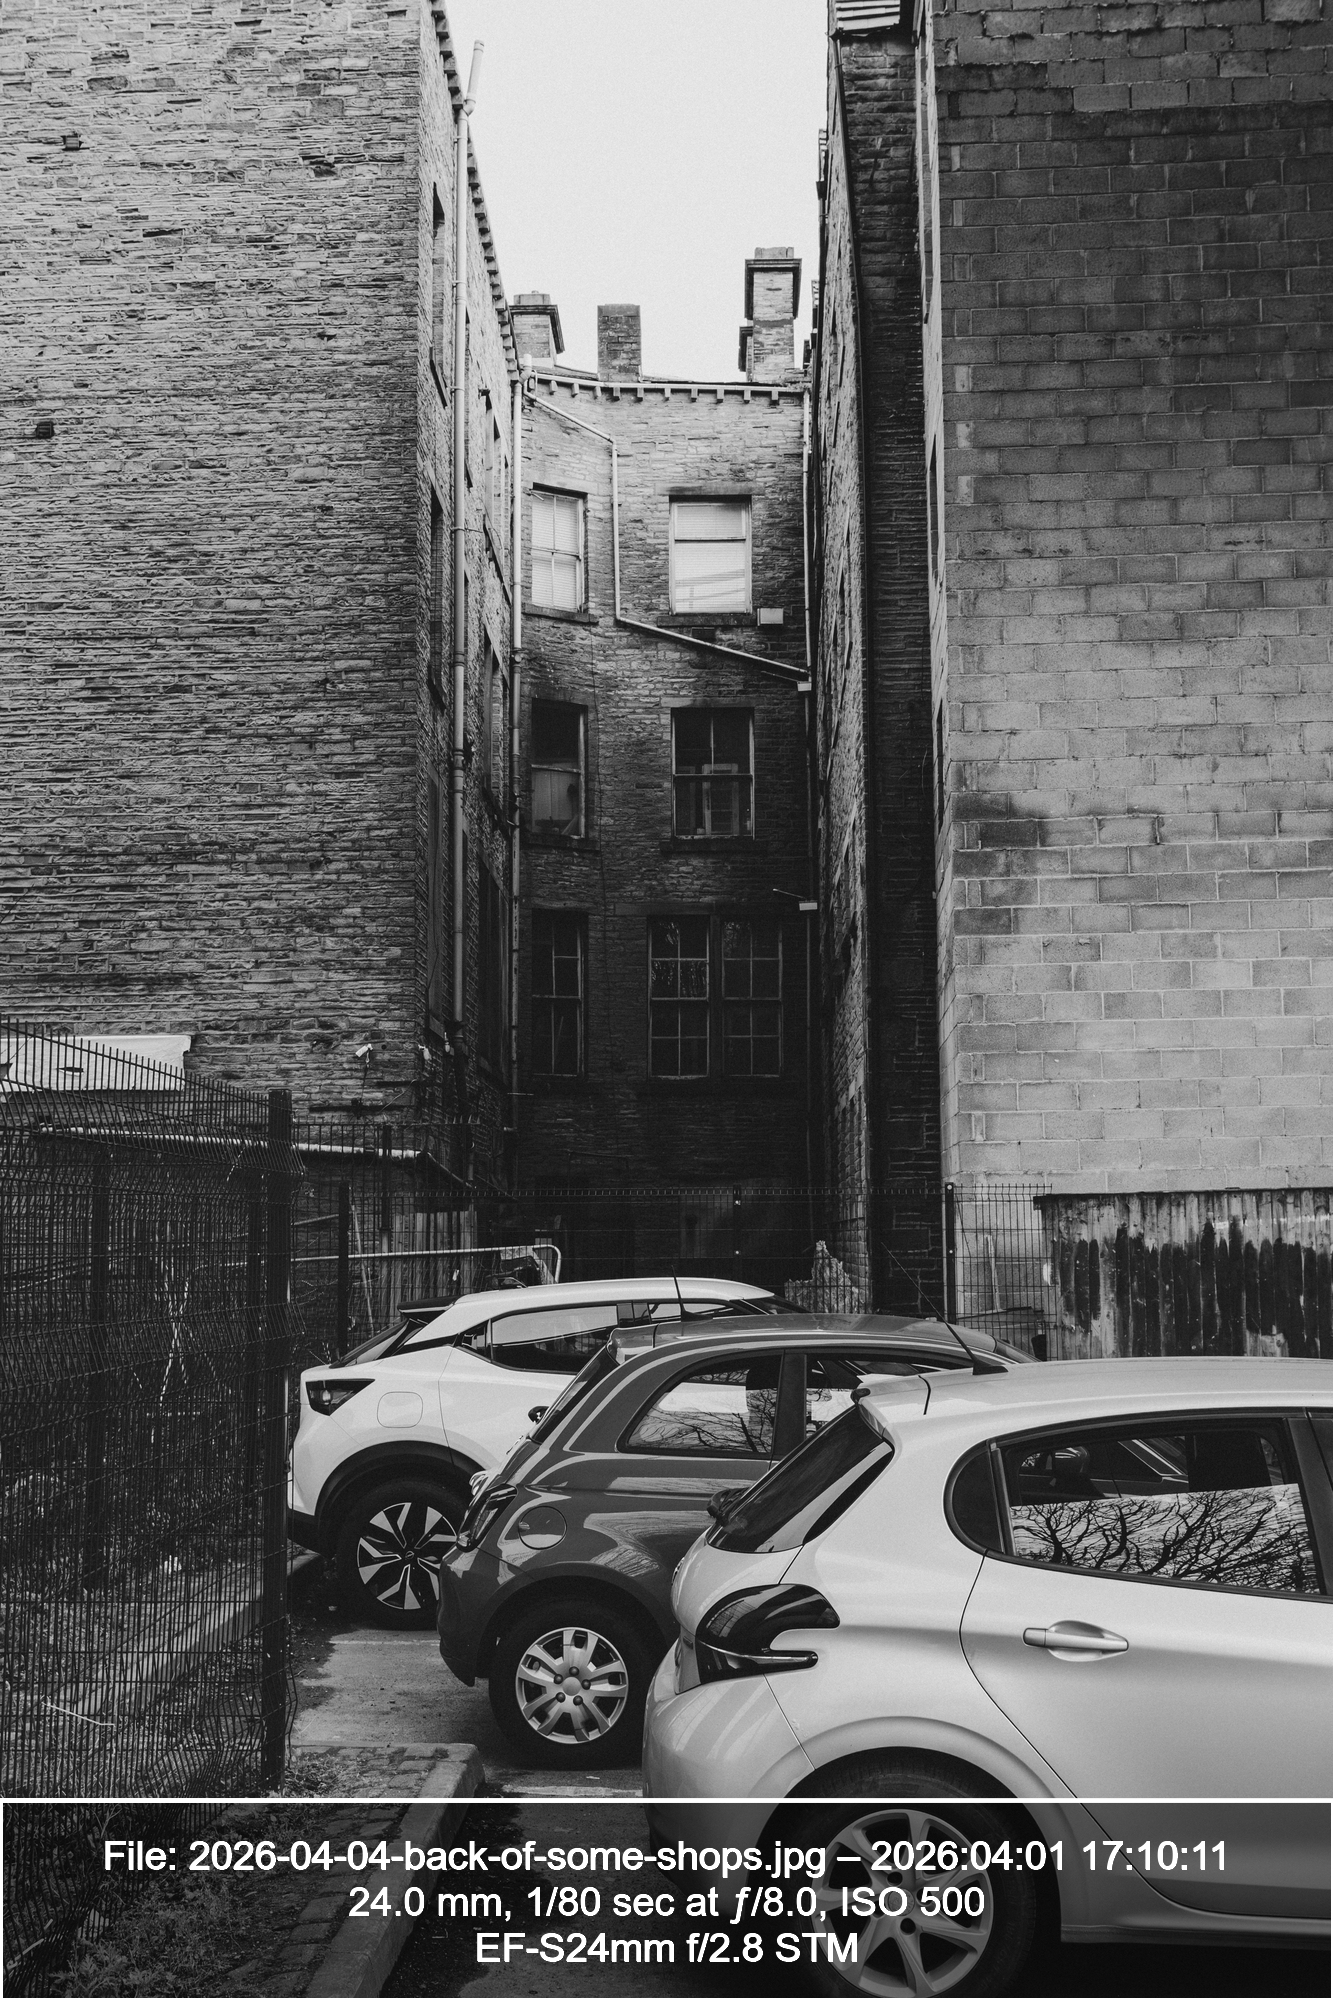
The back of some shops
Conclusion
This took a lot of trial and error and I’m pleased that it works, but I would love it if someone who knows ImageMagick better than me could come up with a more programmatic way of doing this. For example, automatically sizing the box based on the text size, or resizing the text so that it doesn’t flow off the sides of the image in portrait orientation. This might not be ideal for doing batches of images but could definitely be improved.
In any case, I hope this has been helpful to someone.
Notes
-
On my Mac, I used homebrew to install exiftool. On Windows, the process seems to be more of a hassle, but the instructions are on the exiftool website. ↩
-
Like exiftool, there is a homebrew package available for ImageMagick. Also like exiftool, the installation process for Windows is a hassle, but instructions are on the ImageMagick website. ↩
-
To get the stylised ƒ symbol: on a Mac, press option + f. On Windows/Linux, I don’t know. Copy it from here I guess. ↩
-
This example assumes everything is in the same directory, our current working directory. ↩